Build Dev with Browser
Summary of Tasks to Build Trio dev
Use for dev or feature branch
This page is useful for building the dev branch or any other feature branch found in Trio. Where you see dev just replace with branch-name where branch-name is the branch you want.
These steps assume:
- You previously built Trio using GitHub Actions (Browser Build)
- You confirmed your Apple Developer license agreements are up to date
These are the new steps for you to follow:
- Configure
Forkwithdevbranch- Optional: Configure the
devbranch as default
- Optional: Configure the
- If new Identifiers are required: Update
Identifiers - Optional: Update
Certificates; this is included in Build Trio - Build Trio
dev
Configure Fork with dev branch
- If you do not have a
devbranch you must first configure one following these directions. - If you already have a
devbranch, skip ahead to Update Branch and be sure to select thedevbranch when you update yourfork.
Add Branch
First, you need to get to your fork of the Trio repository and tap on the branch icon. (Do not worry about how many branches you have.):
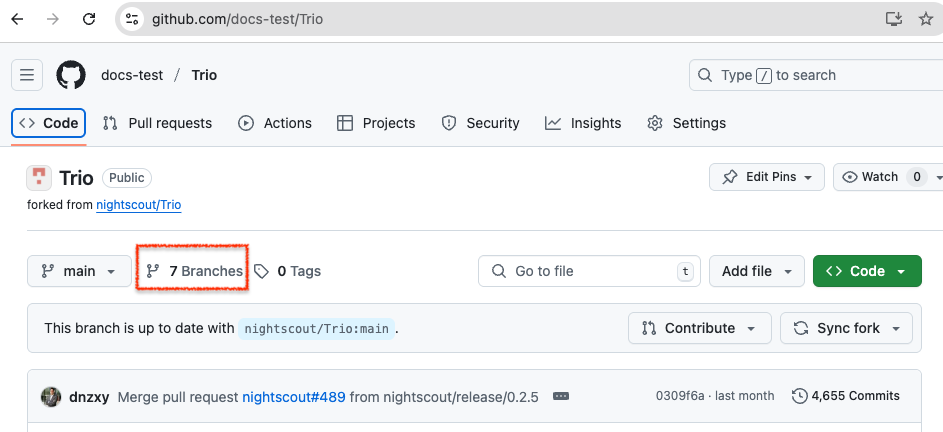
The next screen displays the branches you currently have.
- If the branch you want is already there - click on it so you can make sure it is in sync with Trio
- If the branch you want is not there, tap on the
New branchbutton on upper right- If there is not a
New branchbutton in the upper right, you are not logged in
- If there is not a
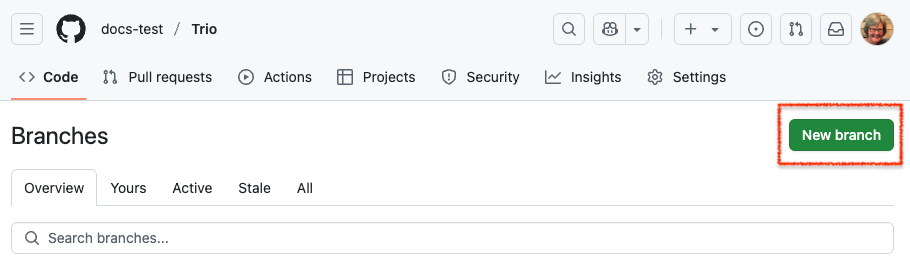
Each step in the list below matches with the number in the graphic. On the left half of the graphic is the default selections for your fork when main is the default branch. The right side shows the display after making the indicated selections:
- Click on the drop-down menu labeled 1 in the graphic and choose nightscout/Trio
- Click on the drop-down menu labeled 2 in the graphic and choose
dev - Click on the
Branchname box labeled 3 in the graphic and typedev- The branch name in your
forkshould always match the branch name you are adding; check that you type it correctly
- The branch name in your
- Review the dialog items to make sure everything is correct, and then tap on Create branch

Configure the dev branch as default
This recommendation is only for expert testers who are using
devor a feature branch for their personal use. Typically only developers configure thedevbranch as their default branch.
- By making the
devbranch your default, you will get automatic build of anydevupdates weekly - You will no longer get automated builds of the
mainbranch, but can run those manually
These are the steps to modify the default branch.
For this example, we show how to change from a default branch of main to a default branch of dev. Note — only the owner of the repository can take this action and they must be logged in. Otherwise the Settings tab does not appear.
For the numbered steps below, refer to the graphic found under each group of steps.
-
Click on the Settings Icon near the top right of your Trio repository
- You may need to scroll down to see the
Default Branchas shown in the graphic - Do not tap on the Branches tab to the left under Code and Automation, that is not the correct menu

- You may need to scroll down to see the
-
To the right of the default branch name there is a pencil and a left-right arrow icon (⇄)
- Tap on the left-right arrow icon (⇄) to bring up the
Switch default branch to another branchdialog
- Tap on the left-right arrow icon (⇄) to bring up the
- Click on the dropdown next to the current default branch, in this example,
main

- Select the desired default branch, in this example,
devwas selected -
Click on the
Updatebutton -
You will be presented with an are-you-sure question.
- Click on the red
I understand, update the default branch.button
- Click on the red
Your default branch has been changed.
Update Branch
The dev branch of the nightscout/Trio repository will be updated frequently. This is how you know if your fork needs to be updated as well. As long as the automatic runs are happening weekly for your repository — you will not need these manual instructions, unless you want to manually build an update sooner.
Tap the Code button (upper left) and ensure this branch in your fork is up to date.
- Select the desired branch in the dropdown menu (this graphic shows
mainbranch, to get 0.5 (or newer), you must choosedevbranch) - If the message indicates this branch is "behind", tap on the sync
forkbutton and then the Update branch button

Update Identifiers
At the current time, the dev branch and main branch have the same Identifiers, so this step is not required. If identifiers are added to the dev or feature branch you are using, this will be required.
Refer to the graphic below for the numbered steps:
- Click on the
Actionstab of your Trio repository - On the left side, click on
2. Add Identifiers - On the right side, click
Run Workflowto show a dropdown menu- You will see your default branch (typically this is
main) - To update the
Identifiersfound in dev but not main, you must selectdev
- You will see your default branch (typically this is
-
Tap the green button that says
Run workflow.
Be Patient
- Refresh the browser if you are unsure if the action started
- Do not start a new action until the first one completes
The Add Identifiers Action should succeed or fail in a few minutes. Do not continue to the next step until this one succeeds.
Build the App
If you completed all the steps on this page successfully (got a green checkmark ✅), you are ready to run Action: Build Trio.
If you choose to build a different branch than your default branch, there is an extra step when you Build Trio. In addition to the normal steps 1, 2, and 3 in the graphic below, you must also do the (optional) step. Select the dev branch in the branch dropdown menu before continuing to step 4 and tapping on the green Run workflow button:

Refresh, Do Not Repeat
Hit Refresh
After you tap the green Run workflow button, GitHub can be slow to update.
- Refresh the browser if you are unsure if the action started
- Do not start a new action until the first one completes
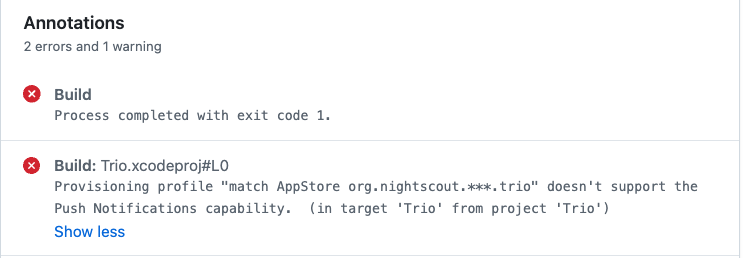
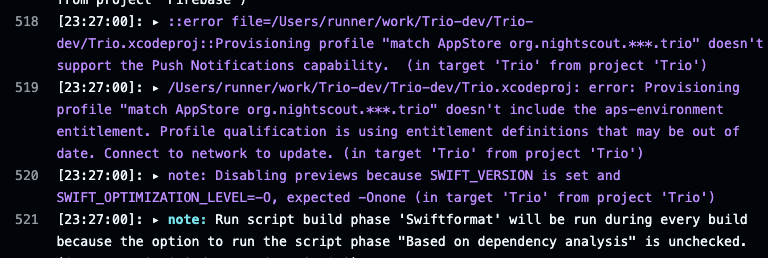
Update Build Errors
Read the build action annotations if you see an error. This example is from the past when Push Notifications were added to the dev branch.
Example Error
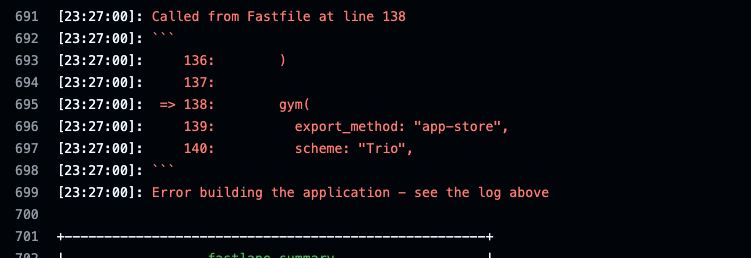
If you decide to look at the action log, instead of reading the annotations, you may see an error similar to the two graphics below.
Solution
- Update
Identifiers- make sure you selectdevbranch - Build the App - make sure you select
devbranch